How to Create a Free Blog on Blogger (Blogspot): Ultimate Guide
What Is A Blog?
A blog is a section of your website that is updated with new content regularly. It’s an excellent place to keep in touch with existing consumers while also attracting new ones.
The content you create will be determined by your industry and target market, but there are no actual limitations when it comes to blogging.
You may write about industry trends or make a remark on current events in your field. Also, you can start a blog for a different purpose.
In short, your blog should represent the tone of your company, provide helpful information to your target demographic, and indirectly tell your readers why you’re fantastic.
Why Do Blogging?
A website blog is a great way to show the world that you’re an authority in your subject, which can lead to a slew of other advantages. Here are four of my favorite blogging advantages.
- Find new customers
- Create fresh content to share on social media
- Boost your online profile
- Generate backlinks
Blogger Vs. Blogspot
Before we continue, let’s clear up any misunderstandings about Blogger and BlogSpot’s names.
Blogger is a free blogging platform, and BlogSpot is a free domain registration service.
They’re both Google products and utilized in tandem on the Blogger platform.
- Enter the following URL: blogspot.com
- You’ll be redirected to this address: blogger.com.
- When you establish a blog on Blogger, you’ll be given a BlogSpot domain by default. However, you are not required to use the BlogSpot domain; you can use your own.
To sum it up: Google hosts your blog on their Blogger platform with a default BlogSpot domain.
Advantages and Disadvantages of Blogspot
Advantages of Blogger
- When compared to other blogging systems such as WordPress.
- It is also free.
- Faster indexing – Within 24 hours, Blogspot sites appear in Google search results.
- Making money with AdSense and other sources is a possibility.
- You can easily combine any of Google’s other products, and you can even add your own custom domain.
- A free SSL certificate is available.
Disadvantages of Blogger
- Themes and plugins are more limited on Blogspot.
- If you don’t keep your blog updated, you risk losing traffic.
Further reading: advantages and disadvantages of blogger blogging platform: everything you should know.
How to Sign Up for Google Account?
You can begin blogging with Blogspot after first creating a Google account.
1. Open your web browser and go to google.com.
2. To create an account, click the Sign-in option.
3. You’ve arrived at the login screen. If you already have an account, log in using your email and password; otherwise, create one.
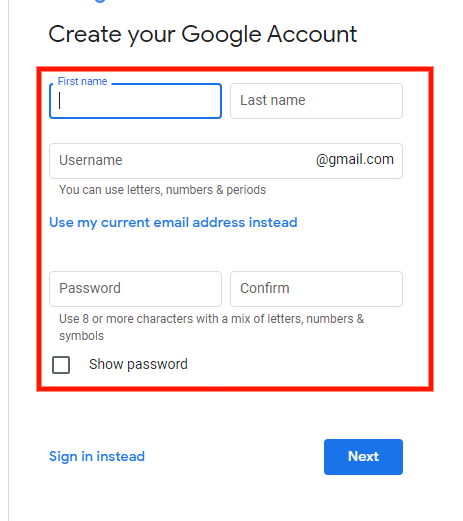
4. Complete all required fields and click the Next button.
5. You will receive a welcome message once your account has been created.
How to Create a Free Blog on Blogger?
Do you have a Google Account already? If you do, go to Blogger.Com and sign in using your Google Account to gain access to all of Google’s free tools.
Once you’ve logged into Google’s Blogger service, you should see this page.
The first step is to start a blog with a name that best expresses you.

When you click the “Create your blog” option, you will be presented with a title box where you may give your blog a name. Click the “Next” button after entering the name of your new blog.
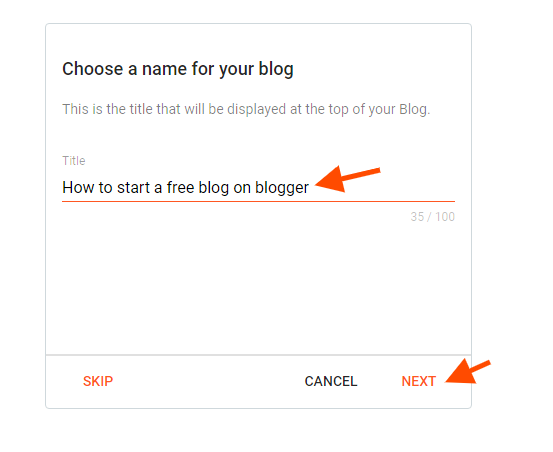
The next step is to select a URL for your blog. In the address field, type the blog’s URL. The availability of the domain name will be checked, and if it is, the “NEXT” button will be highlighted.

Nex, choose the name you want to be shown to your blog visitors and hit the “Finish” button

Congratulations on your successful creation of a Blogspot blog!
How to Change A Theme on Blogspot?
After you’ve created your blog using the domain YOURCHOICE.Blogspot.Com, go to the left side of your Blogger dashboard and click “Theme.”
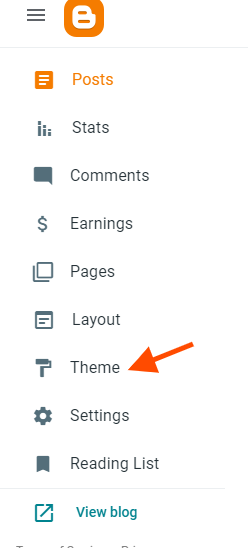
Choose a Blogger template that is already available. You can preview it first to see how your blog will look like. After that click “apply”.

But I wouldn’t say I enjoy it on a regular basis.
So I’ll pick one of the most professional-looking free Blogger themes. You may do the same by downloading and uploading a theme to your free Blogger website. This is how it’s done:
Choose from a variety of free Blogger themes from gooyabitemplates.
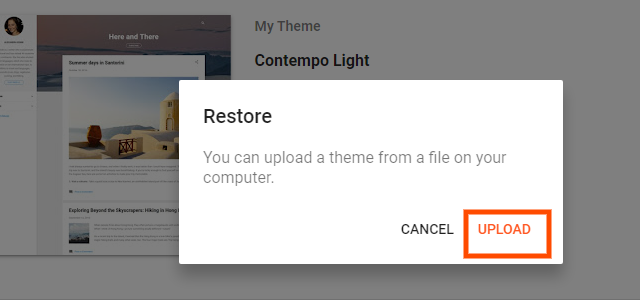
Go to the ‘Theme‘ area of the menu.
To the right of the ‘Customize‘ button, click the down arrow.

‘Restore‘ is the option to select.

And then upload the blog theme you’ve chosen.
You may also customize any theme by selecting it and clicking the ‘Customize‘ option. For this demo, I’ve picked the ‘Flash news template‘ theme. However, depending on your niche, you can select a Blogger template.
Is Your Blog Visible to Search Engines?
1. On the left sidebar, select the Settings menu item.
2. Go to the Privacy section of your page and scroll down.

3. Double-check that the toggle button is turned on. It should be Green.
How to Upload A Logo and Favicon on Blogspot Blog?
Of course, the default logo will be the Bloggers logo. To make your free Blogger site look professional, you must now upload your logo and Favicon. To accomplish this,
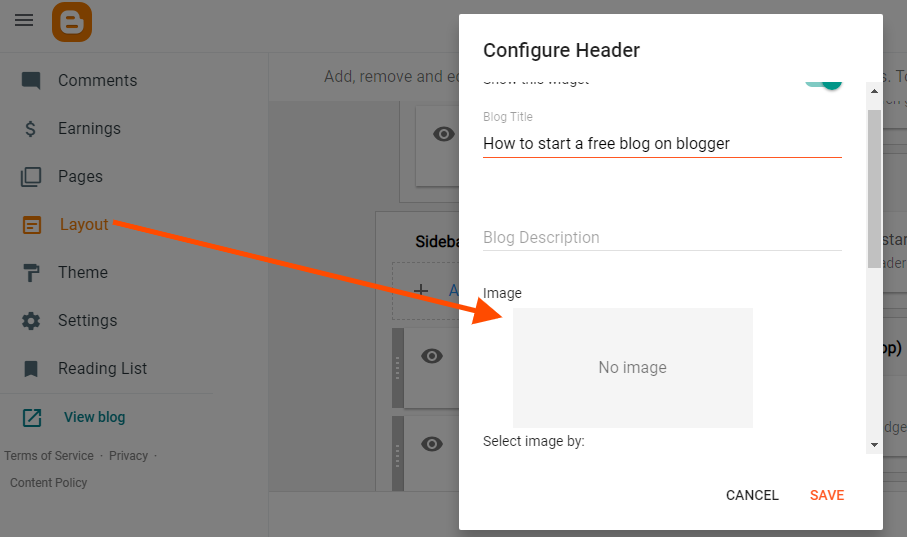
From the dashboard, go to ‘Layout’ and click the ‘Change Cover‘ button in the left sidebar of the blog dashboard.
Choose a Blogger template for your blog cover and upload your logo in the ‘Cover image‘ area.
To upload your Favicon, click here.
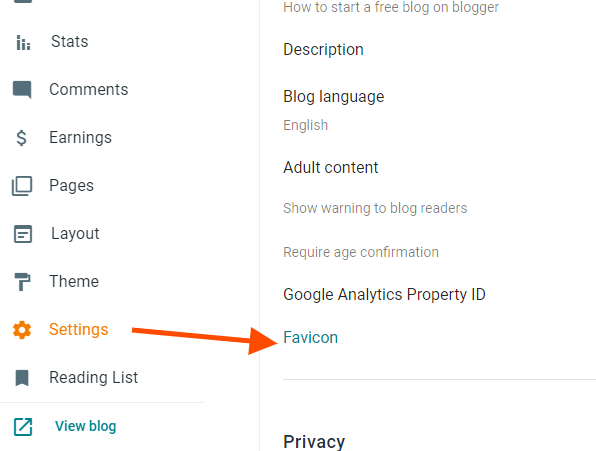
- From the left bar, select ‘Settings.’
- Scroll down and click on ‘Favicon.’
- Select a file and save it as your Favicon.
But how are you going to make your logo and Favicon? Of course, Canva is the solution.
Privacy policy and terms and conditions
Now that your free website is up and running, it’s time to fill in the blanks with information about yourself, your privacy policy, and your terms of service. People will want to read these disclaimers before they start using your stuff.
These pages are necessary for dealing with legal issues and for search engines like Google to index your site. These pages can be written by you, but it will take a lot of time and knowledge.

Use any policy generator to generate privacy policy and terms and conditions pages. A good example is terms feed Here’s how it’s done:

- Visit the Privacy Policy Generator page.
- Select ‘Generate Privacy Policy’
- Follow through the terms feed wizard to create your
For no cost, you’ve just built a privacy policy page for your website.
If you wish to make a ‘Terms of Use’ page, follow the same steps. Create a conditions page for your website using the free Terms & Conditions Generator.
Contact and About us pages
It’s time to fill in the blanks on your free Blogger website with more information about yourself and your business. To add any page to Blogger, follow these steps:

- In the left menu, select ‘Pages.’
- Select New Page.
- Give the page a name
- Fill in the blanks with pertinent information.
- Save, Preview Page, or Save Publish in the dashboard’s top right corner.

In the same way, you may make a contact page. However, you may need to use Blogger’s widget library to create a ‘Contact‘ widget.
How to add a menu in blogger
If you haven’t already, you should add some layout to your free Blogger blog. And the most effective method is to construct a menu for your website
In the left sidebar, select ‘Layout’ and then ‘Add a Gadget.’ Continue scrolling until you reach this section:

Drag ‘Menu’ to the right. You’re good to go after making a couple of changes. That’s how simple it is to make a menu on your free Blogspot website.
How to add social media accounts to blogger
As your Blogger free blog takes shape, the next logical step is to include social media sharing buttons. It will boost your social proof and raise your readers’ faith in you.
You’ll also start promoting yourself on social media. Using Blogger, you may add social links to your free website.
- On the left sidebar, click ‘Layout’ and then ‘Add a Gadget.’
- Choose ‘HTML/Javascript’ after scrolling all the way down.
- Include connections to your social media accounts.
How to Publish A Blog Post on Blogspot?
Creating a blog article entails a number of steps. We’ll go over a couple of them in detail below.
Compose a new post
To make a new post, click the New Post button.

The blog post editor and toolbar
A post editor will appear on the screen. HTML and Compose views are available in the post editor. To access these settings, click the pencil icon on the composer toolbar. For novices, I prefer the compose view.

It comes with a variety of options. –
- Toggle between HTML and plain text views. Compose a viewpoint
- Insert or edit links, images, and videos, as well as special characters.
- Text alignment, indent increase, and indent decrease
- Insert jump break, bulleted list, numbered list, quoted text, and a bulleted list
- Right-to-left layout, left-to-right layout, and input tools
- Undo and redo
- Font style, font size, headings, and paragraphs are all factors to consider.
- Bold, italics, strikethrough, text color, and text background color are all options.
- Clear formatting
Add content to a blog post
Just as with a word processor, type in your blog post title, article, and photographs.

How to Insert an image into a blog post in blogger
1. Place the cursor where you want the image to appear in the blog post.
2. In the toolbar, click the picture icon.

3. There are four different ways to include an image in your blog article.
- From your PC, upload
- Blogger Photos By URL
- If you’re uploading photographs from your computer, select the relevant image file from the Choose files menu.
4. To access the Select button, click on the uploaded image.
Your blog post will be updated with the required image.
How to Insert a link to a blog post in Blogspot
1. To begin, copy an internal or external URL.
2. Choose a text to link to an internal or external URL.
3. On the composer toolbar, click the link icon.

4. A paste or search for a link option will display. Copy the URL and paste it into the provided box.
How to Embed YouTube videos to a blog post
1. On the composer toolbar, click the Insert Video icon.

2. The YouTube choice will appear in the drop-down menu. Select it by clicking on it.
3. To add a video, you have two options: Uploads and Search. Choose the Search option.
4. A search box for finding videos on YouTube. Select a video and use the magnifying glass to enlarge it.
5. From the populated list, choose a video.
6. Select the option from the drop-down menu. This video will be included in your collection.
How to Add labels to a blog post
Labels can be added to your blog post. Your post’s label is another term for its category or tag. On the blog post, these labels are visible. When a reader clicks on a label, a page with all of the posts with that label appears. You can use a label gadget in Blogger to add labels to your blog’s sidebar. It will make it easier for your readers to read all of the entries that have the same label.
1. From the Post settings on the right sidebar, you can add Labels.

2. Select Labels from the drop-down menu. A box will appear where you may enter labels.
3. add labels to the post that are relevant to it.
You’ve done an excellent job.
How to Edit permalink of a blog post
1. You can change the permalink for your blog post. Under the Post options, you’ll find this option.
2. Select Permalink from the drop-down menu. There are two options: automatic and custom permalinks.

3. To keep your blog post URL brief and user-friendly, choose the custom permalink option.
How to Preview and publish a blog post
Before publishing your blog post, you can see a preview of it. To do so, go to the upper right corner and click the Preview button.
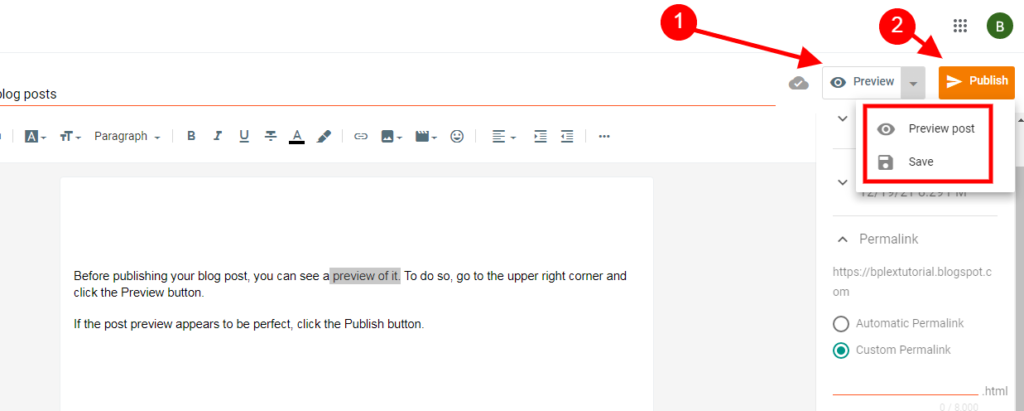
If the post preview appears to be perfect, click the Publish button.
How to add a custom domain on blogger
If you’re like me, you might wish to remove the blogspot.com component from your site’s URL. You could wish to add a custom domain name for it, and here’s how to do it.
Go to the ‘Settings’ menu.
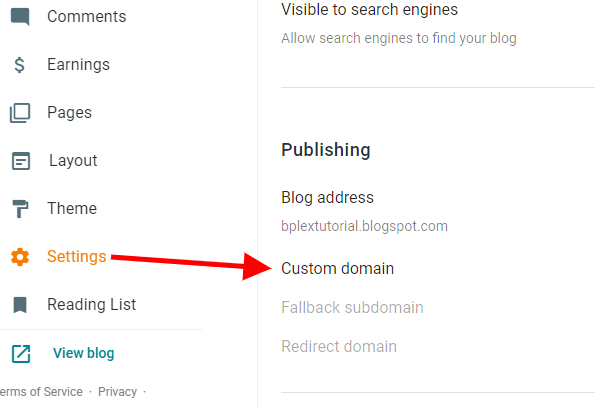
Select ‘Custom Domain’ from the drop-down menu.
Click ‘Save’ after adding your unique domain.
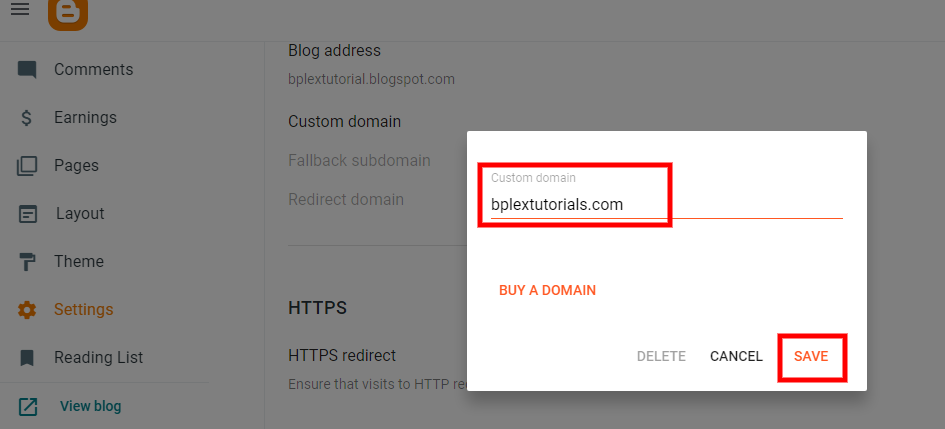
If you don’t already have a domain name, Namecheap is a good place to start. Change the DNS settings as instructed by Blogger when you first added your custom domain name.


